Many professors show videos as part of their lecture. I’ve been in classrooms where the professor left their Powerpoint and went into a browser to show a video, or even clicked on a link in their presentation, which opened up a browser that played the video, typically in YouTube.
Instead of viewing videos on YouTube that are interrupted by annoying ads, congested with video suggestions and polluted with vitriolic comments, embedding and linking videos in your Powerpoint or Keynote is a better way to go. It’s quick, easy, and looks more professional.
There are two methods for inserting your video into Powerpoint: embedding and linking. Let’s explore the differences between the two and how to go about doing each one. But first, make sure to download the latest version of whatever software you are using for your presentation. The University of Windsor campus has a campus-wide license for Microsoft Office 365 for all faculty, staff, and students. Keynote is available in the App Store for free.
Linking a Video
This is as easy as copying a YouTube URL into your Powerpoint (linking videos is not available in Keynote). You still need an internet connection to play the video. Advantages to linking include keeping the file size of your presentation small for quick transfer, and you also don’t have to worry about processing power or file compatibility. A disadvantage is, you can’t trim the length of the video while preparing the presentation, however you can skip ahead to a pre-determined time while it is playing, or start it at a specific time. Also, if you pause the video, film suggestions will be displayed, and if you accidentally click on one, it will open that video in a browser.
To link a video, click on the Insert option in the Powerpoint Ribbon. Then click on Video and Online Movie. Paste a YouTube or Vimeo URL into the text field and that’s it.

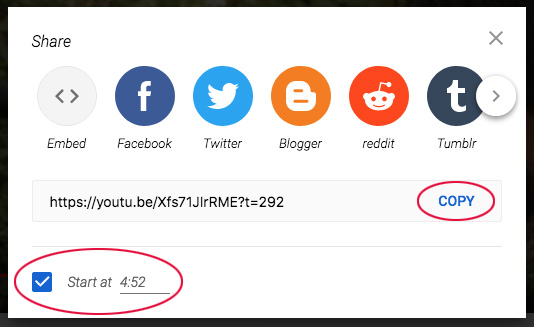
But suppose you want to start the video at a certain time. To do this find the time you want to start at in YouTube (this option isn’t possible with Vimeo). Then click on the Share button and check the start at option. Then click copy and paste the URL into Powerpoint.

Embedding a Video
If you are using Keynote, or are going to be presenting where you won’t have access to the internet, or the internet is unreliable, you’ll need to embed your video. Embedding videos also allows you to trim the video to the exact start and end times.
There are some things you should keep in mind if you embed videos. Your video will now live permanently in your presentation. Video files can be quite large depending on their length and quality, so your presentation file can get quite large, which can slow down transfer times. You may also have issues with CPU load and file compatibility.
The first step is to get the video. How I would have explained to do this two years ago wouldn’t work now because of browser updates and YouTube enhancements, so if the method I outline below doesn’t work, you’ll have to do some Googling.
Visit Video Grabber (https://www.videograbber.net/) and paste the URL of the video you want to download. You’ll want to download the 720p MP4 as it is a higher resolution which will offer better viewing quality.

Once you have the file, you can then embed it in either Keynote or Powerpoint, then trim and format it to your liking.


If you have any comments or questions, feel free to share them in the Comments section below.
Peter brings extensive expertise in multimedia to support CTL programs, website design, and special events. With around 25 years of experience in graphic and web design, he brings a wealth of knowledge to the table. He is a graduate of Print Journalism and Digital Media from Conestoga College, and and Communication, Media and Film from the University of Windsor.


Comments